Thursday, 26 January 2012

Update/Install Reaver in BackTrack

Reaver is the tool to exploit WPS bruteforce vulnerability.

Reaver is being updated really fast by Tactical Network Solutions. Reaver 1.4 is out now.
Following are step-by-step instructions on how to install Reaver 1.4 on BackTrack 5. If you already have Reaver 1.3 (or any other lower version) installed, then the following commands will uninstall it and update to Reaver 1.4.

You can find the Reaver source code on Google Code. Click here to download Reaver from Google Code.

Step 1 :- Download Reaver 1.4

# wget http://reaver-wps.googlecode.com/files/reaver-1.4.tar.gz


 Step 2 :- Extract Reaver 1.4

# tar zxvf reaver-1.4.tar.gz


 Step 3 :- Browse to the directory where Reaver 1.4 is extracted.

# cd reaver-1.4/src


 Step 4 :- Configure Command

# ./configure


 Step 5 :- Make Command

# make


 Step 6 :- Make Install Command

# make install


 Step 7 :- Command to run Reaver

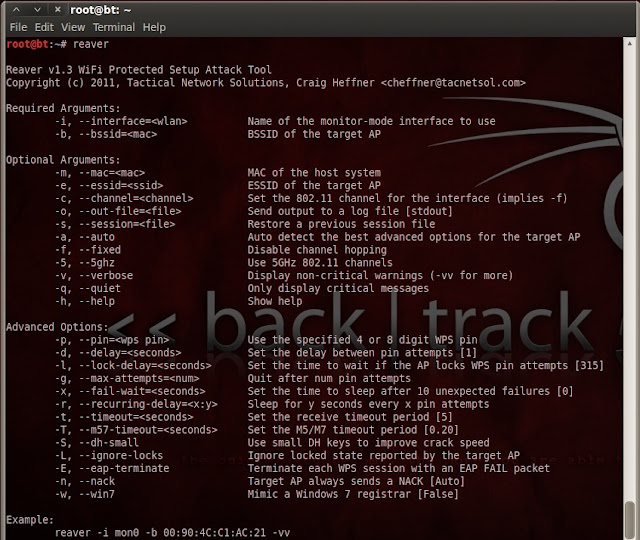
# reaver


 Step 7 :- Command to run Wash

# wash 


Wash (previously called Walsh) is the utility that comes with Reaver 1.4. Wash automatically scans the APs in the range for the WPS bruteforce vulnerability.


Tuesday, 17 January 2012

Dynamic Disks Sucks !!! MS Sucks !!!

A hard disk can contain one or more logical regions called partitions. Partitions are created when the user formats a hard disk as a basic disk. Windows also supports dynamic disks.

Difference between Dynamic Disks and Basic Disks

To understand the features of dynamic disks as against the basic disk, check out the Microsoft Library here.

Basic Disks :-

Basic Disk type is a type of storage most often used in Windows and Linux. It contains the Primary, Extended and Logical drives that we have been using for years.

According to Microsoft, we can do the following operations only on basic disks :-
  • Create and delete primary and extended partitions.
  • Create and delete logical drives within an extended partition.
  • Format a partition and mark it as active.


Dynamic Disks :-

Microsoft has introduced dynamic disks from Windows 2000 onwards. Dynamic Disks is basically Microsoft's way of saying that only Windows can run on your system, since dynamic disks structure supports only 1 OS on the disk. Although, I'm sure it can be dual booted with some tweaks.

This is the biggest drawback of dynamic disks, and also probably one of the reason why the technology was developed at all.
So, if you are going to use just Windows OS, you can happliy also use dynamic disks, no harm done.
But if someone has accidently converted to dynamic disks, and need to install linux (dual-boot with Windows), you need to convert it back to basic disks.

While there are some obvious advantages of converting to dynamic disks, as Microsoft mentions them :-
  • Create and delete simple, spanned, striped, mirrored, and RAID-5 volumes.
  • Extend a simple or spanned volume.
  • Remove a mirror from a mirrored volume or break the mirrored volume into two volumes.
  • Repair mirrored or RAID-5 volumes.
  • Reactivate a missing or offline disk.


Difference between Dynamic Disks and Basic Disks

Dynamic disks use Logical Disk Manager (LDM) rather than the Partition Table used by basic disks. Another difference is that dynamic disks can use noncontiguous extents on one or multiple physical disks. While this is not possible on basic disks.

A default Windows installation partitions the disk as a basic disk, unless specified otherwise. Basic disk can be converted to dynamic disk through the Disk Management utility of Windows. Just right click on the Disk 0 tab, and select "Convert to Dynamic Disk". This is a certain death-trap if you don't know what you are doing, and that's why Microsoft has kept it surprisingly simple to kill dual-booted Linux OS.

Thursday, 12 January 2012

Step-By-Step on how to install Reaver tool in BackTrack

Reaver is a tool to exploit the BruteForce vulnerability in WPS (WiFi Protected Setup). The guys at Tactical Network Solutions have written this tool Reaver. It is available in two versions, open source and commercial. Here's the Google Code link for Reaver :- http://code.google.com/p/reaver-wps/

We'll go through step-by-step to install Reaver 1.3 on BackTrack 5. This is a general step-by-step to install Reaver 1.3 on any Linux such as Ubutntu 11.09.

Installing Reaver is a simple process. We can directly download Reaver 1.3 using the wget command in the directory of our choice and then running the commands configure, make and make install. This should do it.

Step 1 :- Download Reaver 1.3

# wget http://reaver-wps.googlecode.com/files/reaver-1.3.tar.gz


Step 2 :- Extract Reaver 1.3

# tar zxvf reaver-1.3.tar.gz


Step 3 :- Browse to the directory where Reaver 1.3 is extracted.

# cd reaver-1.3/src


Step 4 :- Configure Command

# ./configure


Step 5 :- Make Command

# make


Step 6 :- Make Install Command

# make install


Step 7 :- Command to run Reaver

# reaver 


Step 7 :- Command to run Walsh

# walsh 


Walsh is the new utility that comes with Reaver. Using Walsh you can directly  run the WPS BruteForce Attack on any AP in your vicinity.

Do leave comments, if you found this post helpful or not. :)